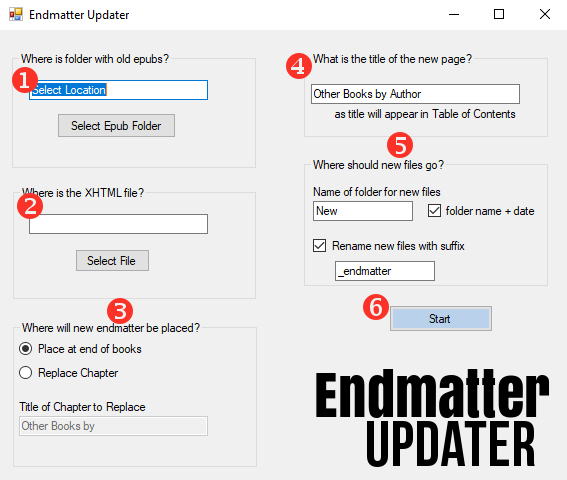
Update EPUB files
This section walks through how to run the Endmatter Updater application.

1. Where is the folder with old EPUBS?
- Every EPUB in the folder will be changed the same way.
- Be sure each file is a correctly formatted EPUB. See Prepare for updating if necessary.
- Click on the "Select Epub Folder" button and select the location.
2. Where is the XHTML file?
3. Where will new endmatter be placed?
Will the new file replace an old one?
- If No, select the "Place at end of books" radio button.
- If Yes, select the "Replace Chapter" radio button.
- The "Title of Chapter to Replace" dialog box will become active.
- Enter the name of the chapter to be replaced.Note: The dialog box contains an example chapter title "Other Books by". Highlight and replace with your old chapter/page title.
4. What is the title of the new page?
Enter the title of the new page that is to be inserted in your EPUBS. This title will appear in the Table of Contents.
5. Where should new files go?
This section sets how the application will treat the updated EPUB files.
The default setting will create a folder in the same directory as the application to place the updated files. The folder will have the name "New" plus the date/time. For example: "New-06-10-2019-164012." This will guard against overwriting files if the application is run more than once. You can change these settings to a name of your choosing. If the date/time is not needed, uncheck the box.
Since the updated EPUBS will be placed into a new folder, there is no need to create a new name for the EPUBS. If the files will not be renamed, uncheck the "Rename new files with suffix" box. Sometimes a new name is helpful. For instance, if the new back matter is different depending on which retailer the book will go to, then changing the name may be preferable. To do that, check the box and add a suffix. The default setting will reuse the EPUB's file name while adding "_endmatter". For example, the default setting would rename "novel.epub" to "novel_endmatter.epub."
6. Start
You're ready! Doublecheck your settings and select the "Start" button.
Next Step
Be sure to check that files were updated as you expected.
If necessary, see Troubleshooting.